GitHub主页设计

  |  

文章导航

我们在逛GitHub的时候常常会看到一些很漂亮的个人主页,包含了使用者在GitHub的活动情况、个人信息以及联系方式等内容。那么我们应该怎样打造应该个性化的GitHub主页呢?就从本文开始吧!

准备工作

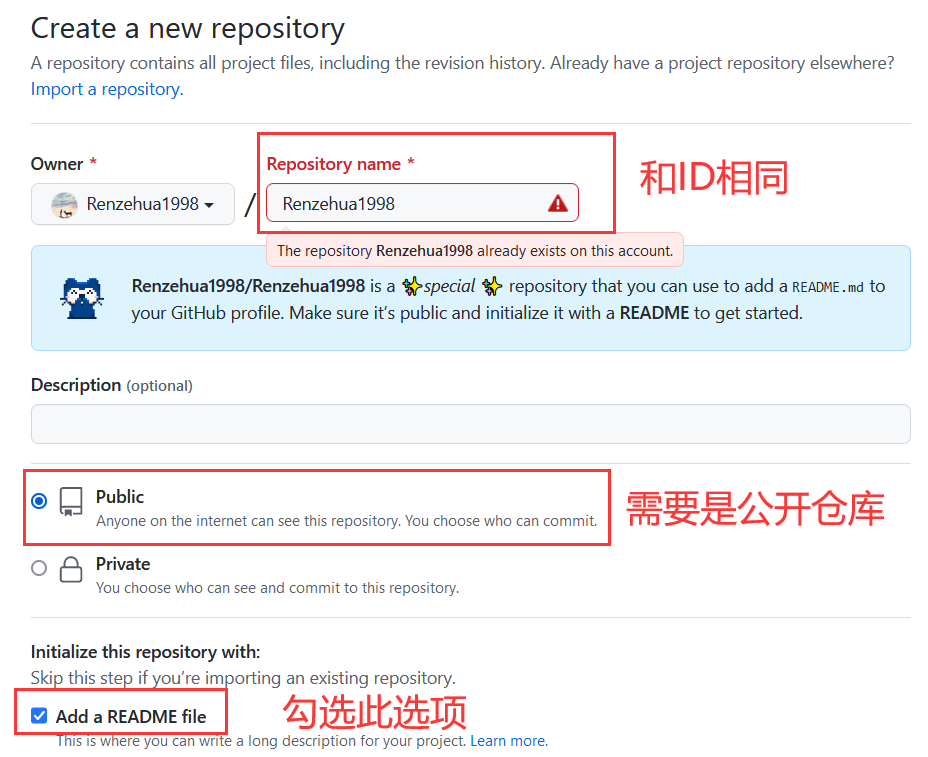
  • 要打造GitHub主页,首先要 有GitHub账号 创建一个和名称自己ID相同的仓库
  • 注意这个仓库必须为公开仓库,并且包含README文件

步骤

  1. 新建仓库
  1. 配置内容
  1. 点击创建即可

基础配置

  • 修改刚刚生成的README文件,其内容即可展示到你的主页

  • 因为markdown文件支持HTML语法,你可以发挥自己的所能设计主页

  • 在这里我介绍几个可能为你所用的API

Emoji

  • markdown是支持emoji表情输入的,我们可以在书写个人简介时加入一些表情

    如:Hi there :wave:, I 'm xxx

  • emoji表情可以直接粘贴,也可以使用 :标签名称: 的格式引入

    上面的挥手表情就是键入 :wave: 来引入的

  • 要找对应的表情名称,可以访问这个网站:https://www.webfx.com/tools/emoji-cheat-sheet/

    输入要查找的表情,或者选择中意的表情直接粘贴过来

状态展示

https://github.com/anuraghazra/github-readme-stats

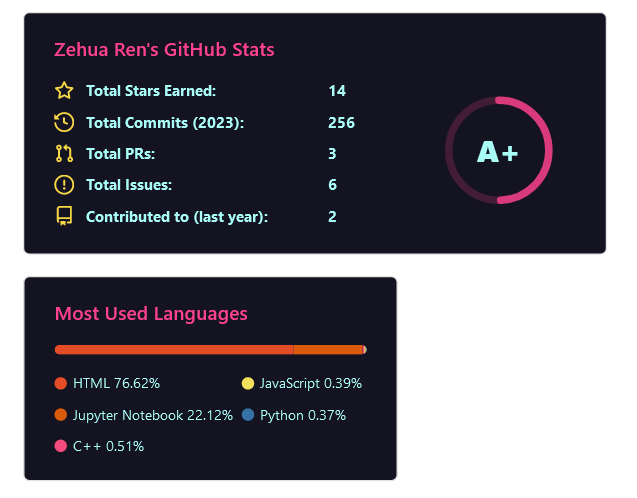
  • 统计你的GitHub活动情况:PR、Star、贡献等等
  • 也可以显示你的语言使用情况
  • 可选主题有:dark, radical, merko, gruvbox, tokyonight, onedark, cobalt, synthwave, highcontrast, dracula
  • 引入方式:放到 <img> 标签里,在 src 属性进行配置即可
1
2
3
4
5
<!--状态展示:-->
<img align="center" src="https://github-readme-stats.vercel.app/api?username=你的用户名&show_icons=true&theme=radical"/>

<!--语言使用统计:-->
<img align="center" src="https://github-readme-stats.vercel.app/api/top-langs/?username=你的用户名&theme=radical&layout=compact" />
  • 还可以放置你最想展示的仓库,使用方式:

    点击即可跳转到对应仓库

1
[![Readme Card](https://github-readme-stats.vercel.app/api/pin/?username=你的用户名&repo=你的仓库名)](你仓库的url)

shields.io 徽标

https://shields.io/

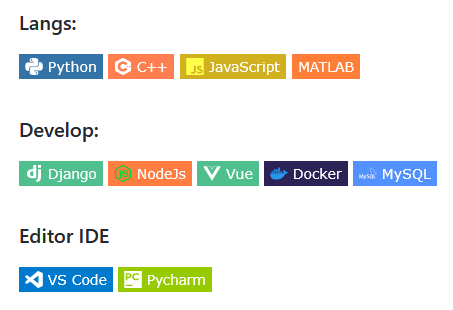
  • 可以使用此API进行徽标制作,只需要引入对应的url即可
1
2
3
4
![decription](https://img.shields.io/badge/<label>-<message>-<color>)

<!-- 例如下面的图片会显示一个绿色的label为lLanguage,信息为Python的徽标 -->
![decription](https://img.shields.io/badge/Language-Python-green)
decription
decription
  • 也可以为徽标添加icon,具体可用icon可以到 https://github.com/simple-icons/simple-icons/blob/develop/slugs.md 查询。
1
2
<!-- 通过style设置徽标样式,通过logo设置icon,通过logoColor设置icon颜色 -->
![Python](https://img.shields.io/badge/Python-3373A7?style=flat-square&logo=python&logoColor=white)
Python
Python

行为折线图

https://github.com/Ashutosh00710/github-readme-activity-graph

  • 显示最近一个月以来GitHub贡献的折线图
1
2
3
![activity-graph](https://github-readme-activity-graph.cyclic.app/graph?username=你的用户名&theme=主题名)

![activity-graph](https://github-readme-activity-graph.cyclic.app/graph?username=Renzehua1998&theme=vue)
activity-graph
activity-graph

阅读统计

1
2
3
4
![img](https://profile-counter.glitch.me/你的用户名/count.svg)

<!-- 可以使用img标签使其右对齐 -->
<img align='right' src="https://profile-counter.glitch.me/你的用户名/count.svg" width="200">
img
img

网站数据卡片

https://github.com/songquanpeng/stats-cards

  • 可以显示自己其他网站账号的情况,如CSDN、哔哩哔哩、leetcode、掘金等
1
2
3
4
![bilibili](https://stats.justsong.cn/api/bilibili/?id=你的用户id&theme=主题名称)
![leetcode](https://stats.justsong.cn/api/leetcode/?username=你的用户id&cn=true)
![csdn](https://stats.justsong.cn/api/csdn?id=你的用户id&theme=radical)
![github](https://stats.justsong.cn/api/github?username=你的用户名&theme=radical)

bilibili csdn

动态文字

https://github.com/DenverCoder1/readme-typing-svg

  • 产生动态输入文字的效果
1
<img src="https://readme-typing-svg.herokuapp.com/?lines=消息1;消息2&font=Roboto" />
  • 可以添加多条消息,可以更改字体和文字颜色
  • 消息中的空格要使用%20代替

进阶配置

  • 前面基础配置中都是有现成的API,直接按照图片格式引入,把参数加到url里面即可
  • 当我们需要一些更酷炫、更个性化的展示内容时,就需要进行动态配置
  • 这里主要用到的是 GitHub Actions 功能

准备工作

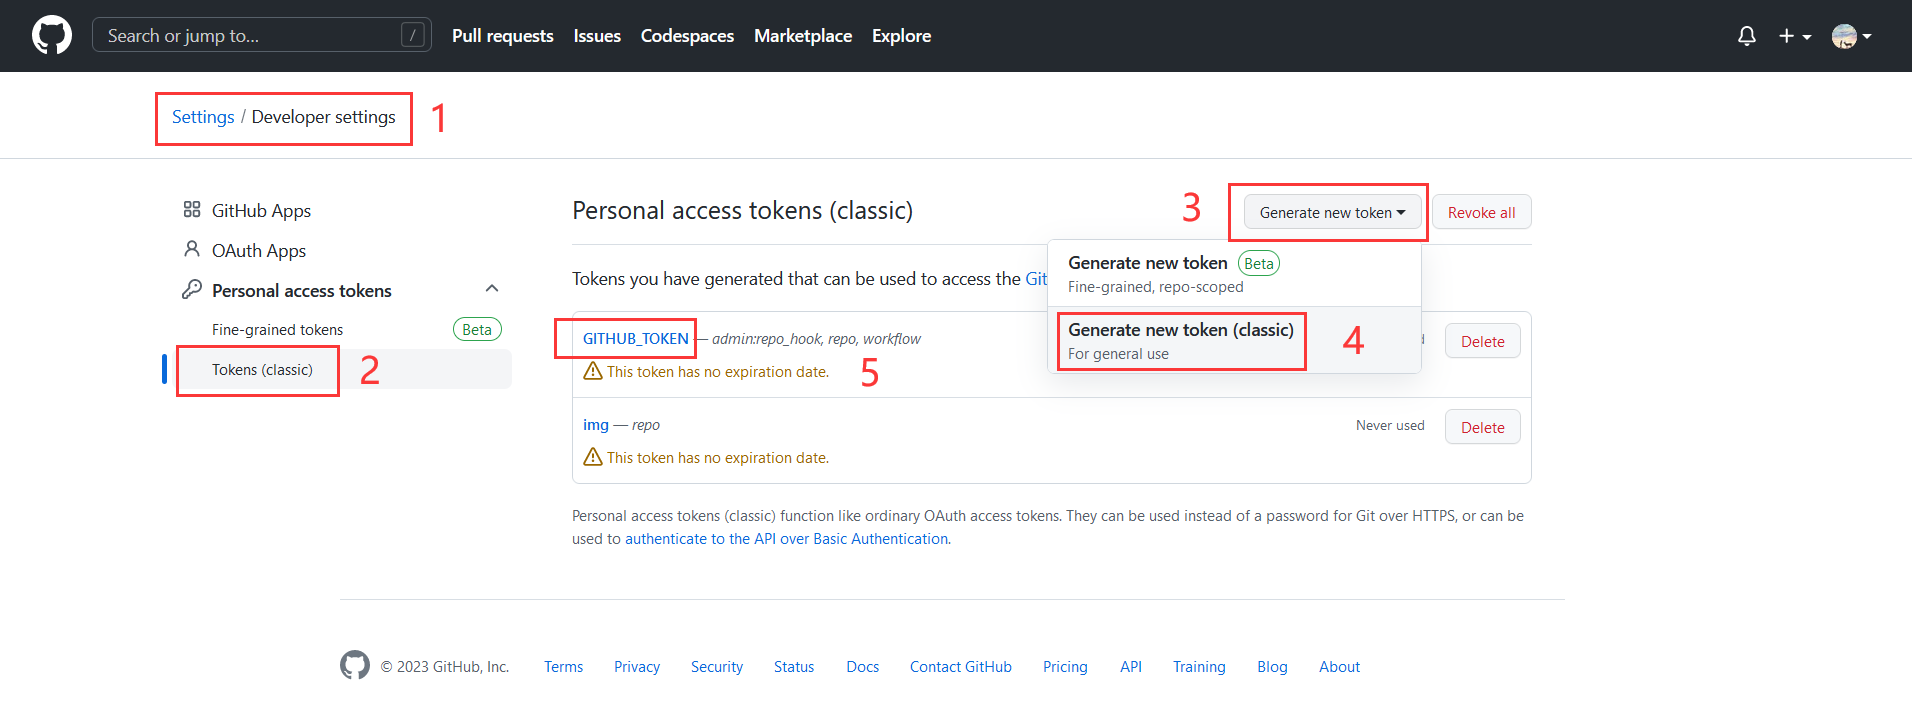
  1. 添加名为 GITHUB_TOKEN 的token
  1. 勾选 admin:repo_hookrepoworkflow 权限
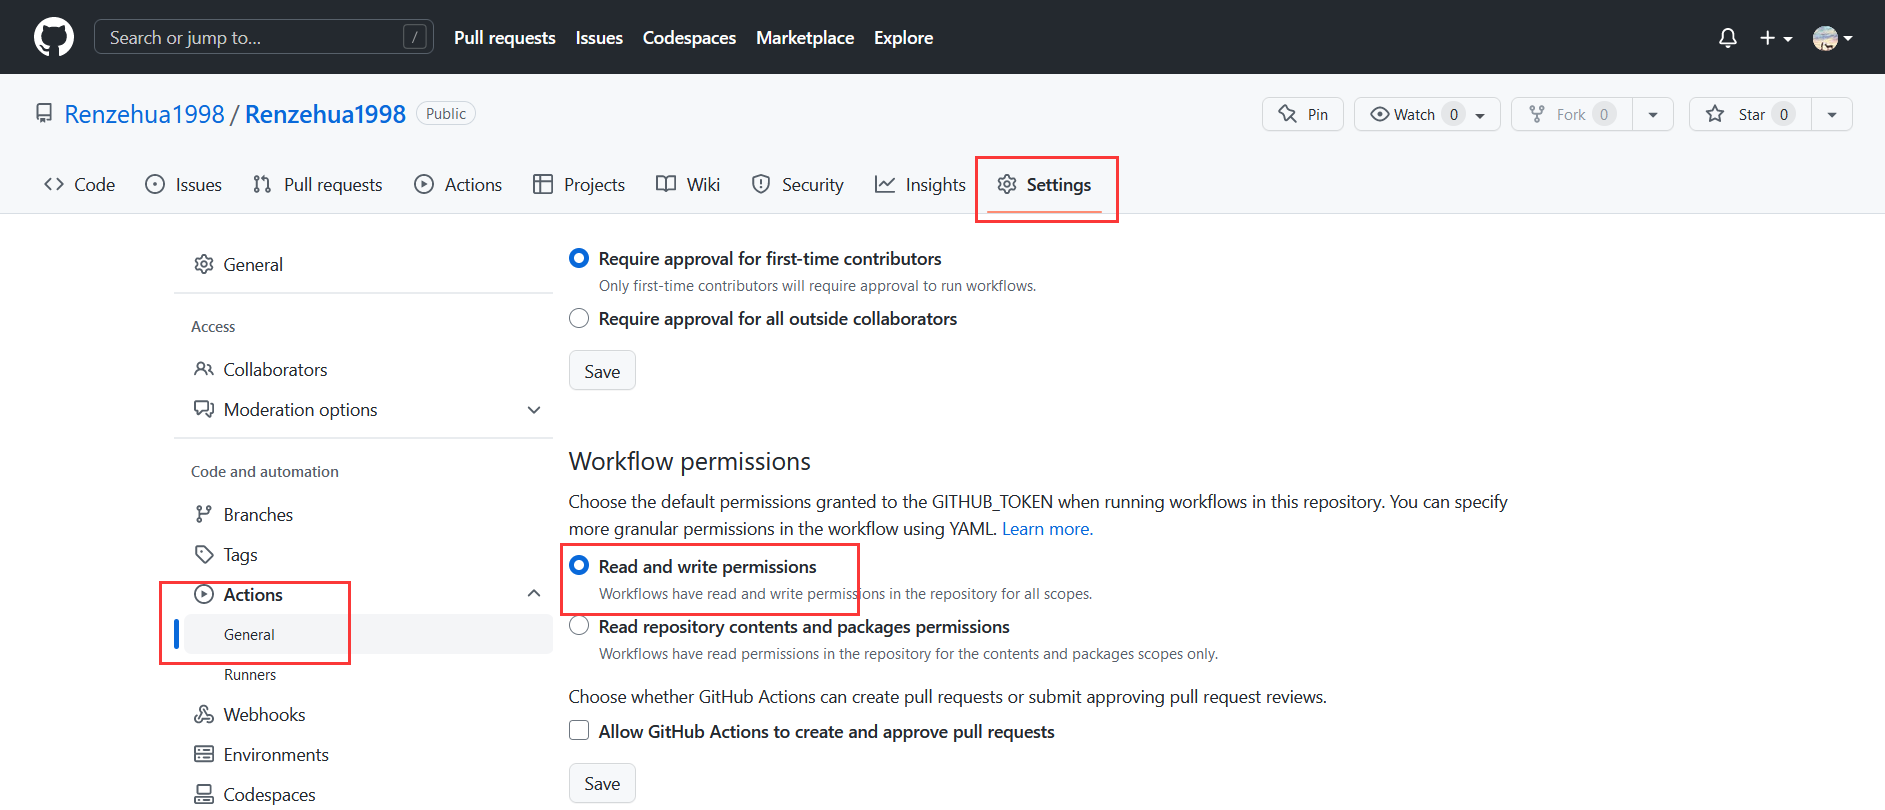
  2. 在和自己用户名同名的仓库里面设置允许Action操作仓库
  1. 在仓库下 .workflow 文件夹下建立 .yml 文件,写好配置即可定时允许更新

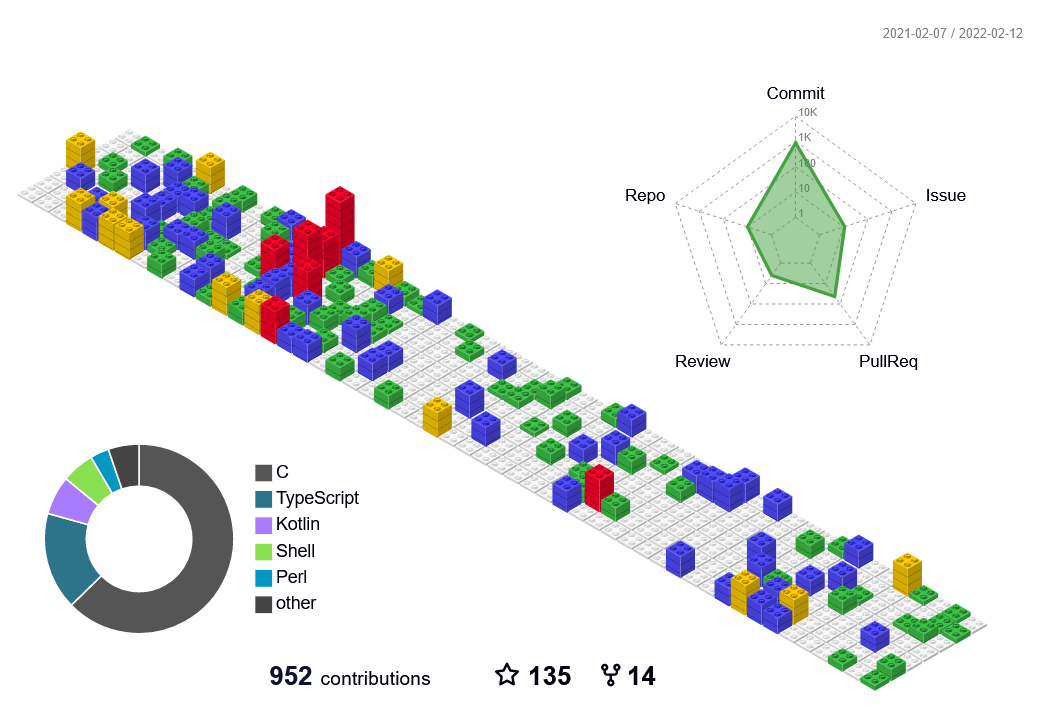
3D贡献图

https://github.com/yoshi389111/github-profile-3d-contrib

  • 在项目里按图片引入(本地图片)
1
![Contributions in 3D](/profile-3d-contrib/profile-night-rainbow.svg)
1
2
3
4
5
6
7
8
9
10
11
12
13
14
15
16
17
18
19
20
21
22
23
24
name: GitHub-Profile-3D-Contrib

on:
schedule: # 02:30 IST == 21:00 UTC
- cron: "0 21 * * *"
workflow_dispatch:

jobs:
build:
runs-on: ubuntu-latest
name: generate-github-profile-3d-contrib
steps:
- uses: actions/checkout@v2
- uses: yoshi389111/github-profile-3d-contrib@0.7.0
env:
GITHUB_TOKEN: ${{ secrets.GITHUB_TOKEN }}
USERNAME: ${{ github.repository_owner }}
- name: Commit & Push
run: |
git config user.name github-actions
git config user.email github-actions@github.com
git add -A .
git commit -m "generated"
git push

贪吃蛇

https://github.com/Platane/snk

  • 放入picture标签可以实现暗黑模式自适应
1
2
3
4
5
<picture>
<source media="(prefers-color-scheme: dark)" srcset="/output/github-snake-dark.svg">
<source media="(prefers-color-scheme: light)" srcset="/output/github-snake.svg">
<img alt="github-snake" src="/output/github-snake.svg">
</picture>
1
2
3
4
5
6
7
8
9
10
11
12
13
14
15
16
17
18
19
20
21
22
23
24
25
26
27
28
29
30
31
32
33
34
35
36
37
38
39
40
name: generate animation

on:
# run automatically every 12 hours
schedule:
- cron: "0 */12 * * *"

# allows to manually run the job at any time
workflow_dispatch:

# run on every push on the master branch
push:
branches:
- master


jobs:
generate:
runs-on: ubuntu-latest
timeout-minutes: 10

steps:
# generates a snake game from a github user (<github_user_name>) contributions graph, output a svg animation at <svg_out_path>
- name: generate github-contribution-grid-snake.svg
uses: Platane/snk/svg-only@v2
with:
github_user_name: ${{ github.repository_owner }}
outputs: |
dist/github-snake.svg
dist/github-snake-dark.svg?palette=github-dark
# push the content of <build_dir> to a branch
# the content will be available at https://usercontent.githubfast.com/raw/<github_user>/<repository>/<target_branch>/<file> , or as github page
- name: push github-contribution-grid-snake.svg to the output branch
uses: crazy-max/ghaction-github-pages@v3.1.0
with:
target_branch: output
build_dir: dist
env:
GITHUB_TOKEN: ${{ secrets.GITHUB_TOKEN }}
本站总访问量 您是第位访客